
Step-by-step guide to setting up your own home lab with VirtualBox.
If this is your first time here, don’t skip the Intro to the series. It lays out the bigger picture and helps you understand the goal of this hands-on lab project from both a learning and technical perspective.
Overview
- Windows VM 1 (Victim)
- Windows VM 2 (SSH)
- Ubuntu Server VM 1 (Sliver C2)
- Ubuntu Server VM 2 (Metasploit C2 – Optional)
- LimaCharlie (EDR) Cloud Platform.
System Requirements for this guide
- 64-bit multi-threaded CPU (minimum 4 cores) with Virtualization Support.
- 16GB RAM (8GB of RAM will slow you down).
- 150GB Disk Space.
Lab set-up Steps
NOTE: To ensure a successful VirtualBox installation without errors, it is necessary to first download install the Microsoft Visual C++ 2019 Redistributable Package.

Installing VC++ 2019 Redistributable
- Head to your download folder.
- Double-click on the VC.exe file to launch the installer.
- Accept the license terms and click on Install.
- Reboot your system.
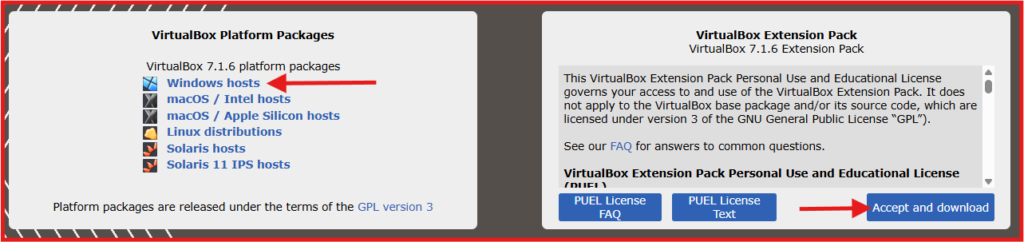
1. Download VirtualBox and VirtualBox Extension Pack:
A. Installing VirtualBox
Head to your download folder and Double-click on the VirtualBox.exe file to launch the installer.

Follow the installation wizard with the steps below:
- Click Next on the initial setup screen.
- Choose the destination folder for VirtualBox (default location is usually fine). Click Next.
- On the next screen, you’ll see options for additional features like networking or creating shortcuts. Leave the defaults, and click Next.
- The installer will give a warning about temporarily disconnecting your network connections during installation (this is normal). Click Yes.
- Click Install to start the installation process.
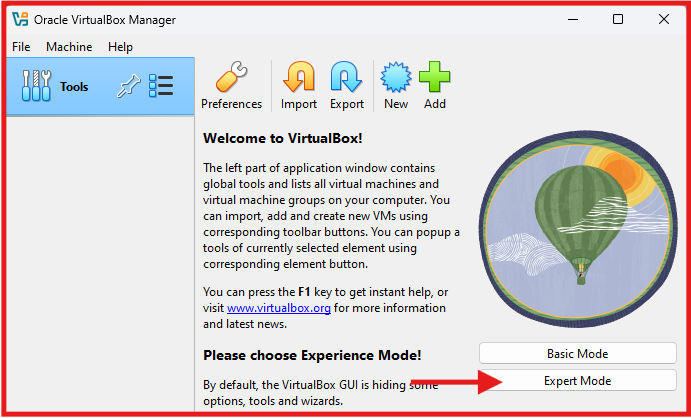
- After the installation is complete, click Finish to exit the installer and start VirtualBox.
- Click on Expert Mode
B. Install the Extension Pack
Head to your download folder and Double-click on the .vbox-extpack file to launch the installer.
- VirtualBox will open and ask you to confirm the installation of the Extension Pack.
- Click Install to proceed.
- You will see a license agreement. Scroll through it and click I Agree.
- The extension will then install.
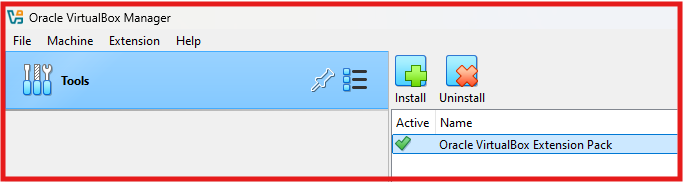
- Once installed, you should see a message indicating the successful installation of the Extension Pack.
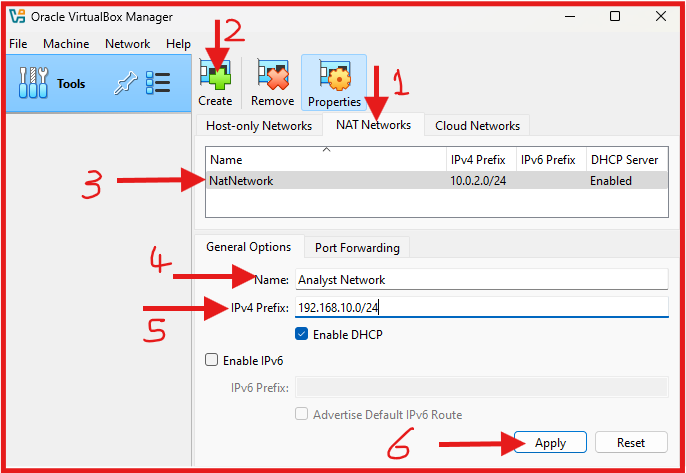
C. Set up a NAT Network with IP Address of 192.168.50.0/24
TO Open VirtualBox Network Settings: Go to File → Tools → Network Manager.
- Click on the NAT Network tab.
- Click on Create – Green plus sign button at the top to Create a New NAT Network.
- A new NatNetwork should appear, with a default IPv4 Prefix of 10.0.2.0/24.
- Edit the Name: To “Analyst Network”.
- Edit the Pv4 Prefix: To “192.168.10.0/24”.
- Make sure DHCP is Enable.
- Click Apply.
2. Download a Windows 10 64-bit Edition ISO File:

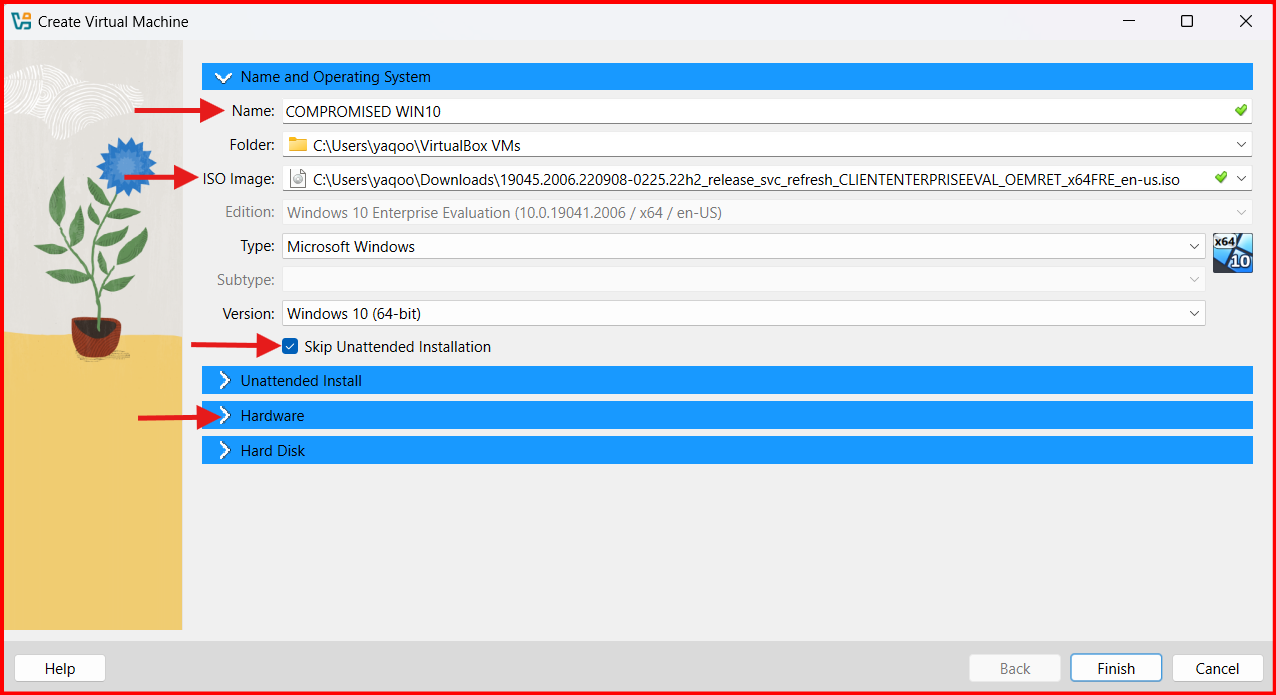
A. Launch VirtualBox: To Create a New Virtual Machine in VirtualBox.
Click on “New” at the top-left of the VirtualBox window.

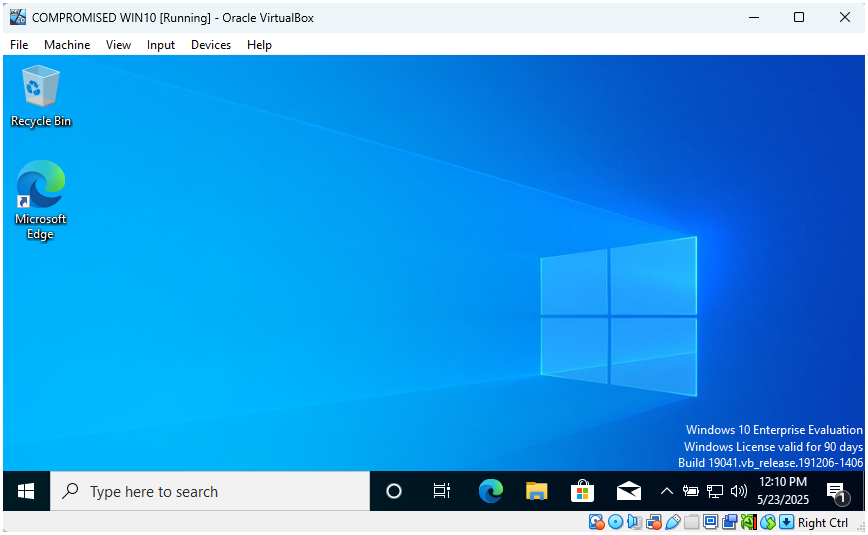
- Name: Choose a name for your virtual machine (COMPROMISED WIN 10).
- ISO Image: Locate the downloaded Windows 11 ISO File in your Downloads and Double click on it.
- Check the box of: Skip Unattended installation.
- NEXT: Click on “Hardware”.
- Allocate Base Memory and Processor:
- Base Memory: 3GB (3096 MB).
- Processor: 2 CPU.

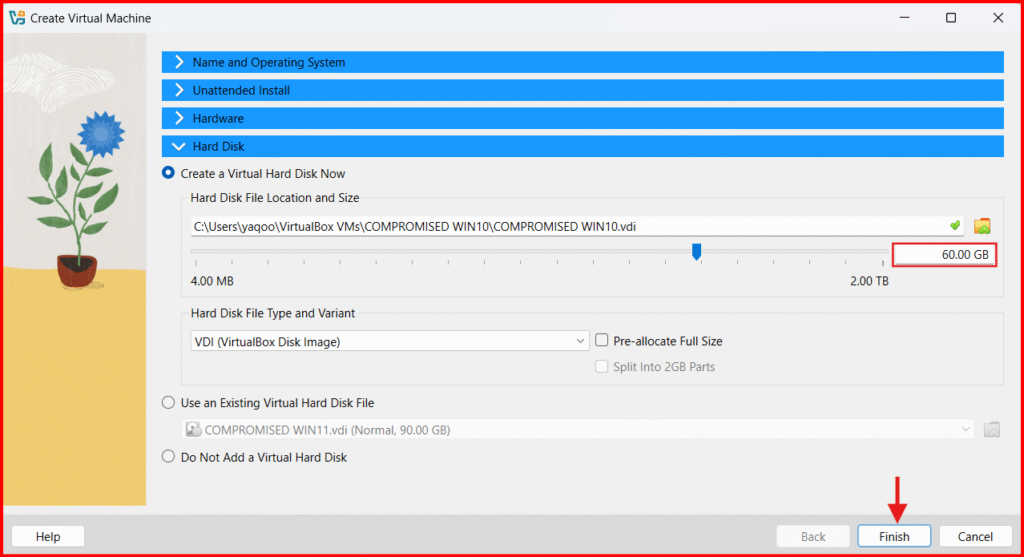
- NEXT: Click on “Hard Disk” to Create a Virtual Hard Disk:
- Hard Disk Size: 60 GB.
- Click on Finish.
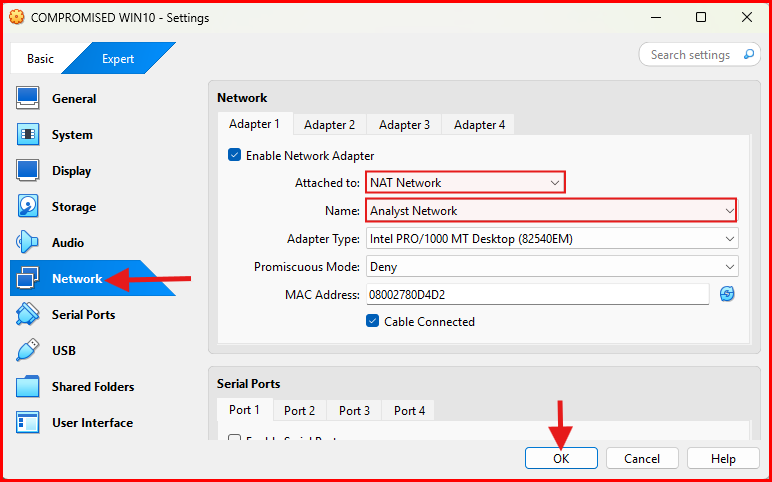
B. Attach Windows VMs to the NAT Network (Analyst Network)
- Click the Settings button (gear icon) at the top of the VirtualBox window.
- A pop up Settings window will appear.
- Click on Network.
- In the Adapter 1 section, make sure the Enable Network Adapter box is check (enabled).
- Attached to field: Click on NAT Network from the dropdown menu.
- In the Name field, select the NAT Network created earlier (Analyst Network).
- click OK to save the settings.
C. Begin Windows Installation:
- Select your new virtual machine and click on the Green Start button at top right.

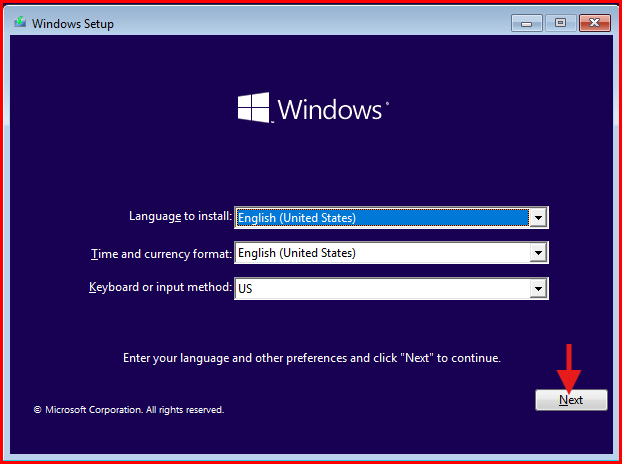
- The virtual machine should boot from the ISO, and the Windows installation process will begin. You may be prompted to press any key to boot from the CD/DVD.
- Under Language settings: Choose the Language, Time and currency format of your choice and click “Next”.
- Click “Install now”.
- Check I accept the license terms Box and click “Next“.
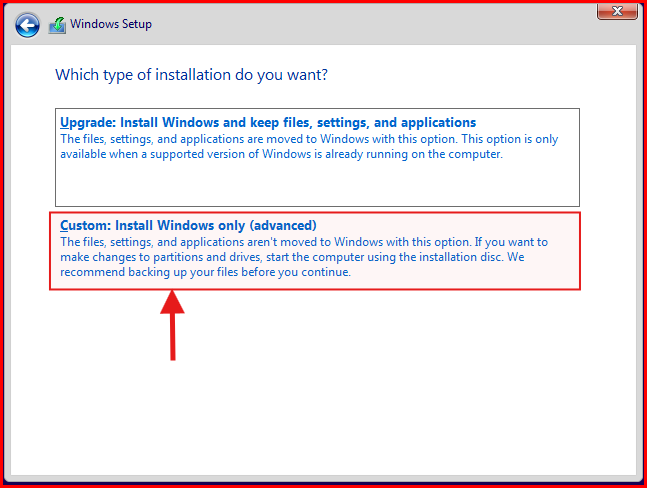
- Select Custom: Install Windows only (advanced).
- The created Virtual Hard Drive will be selected and click on “Next” to begin full installation.
- NOTE: The Installation process will take some time and virtual machine will restart few times.
- Once the installation is complete, follow the on screen instruction to continue with the process.
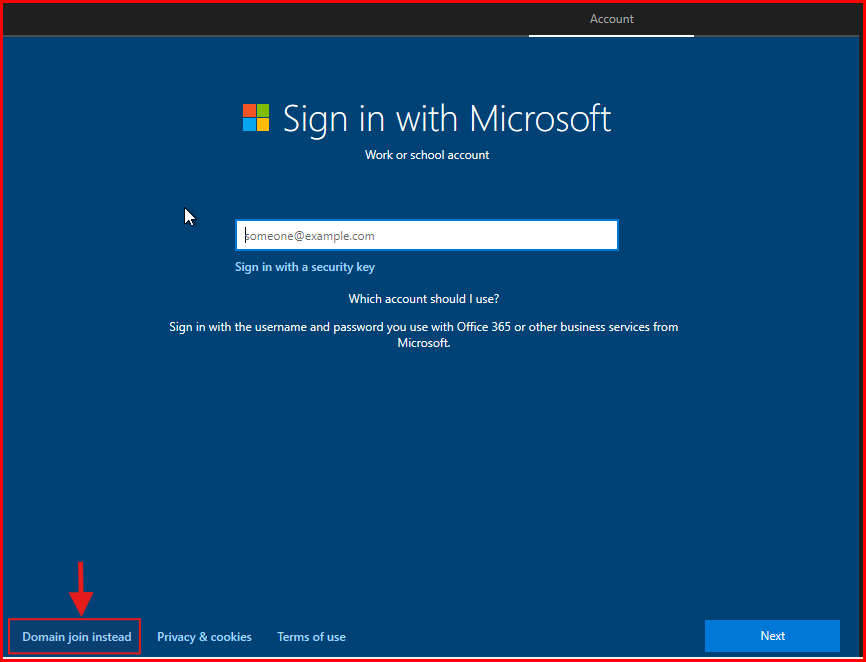
- On the Account Page: Click on “Domain join instead”.
- Next: Specify a username “Bob” and password “password123” for the local account. Also fill out the forget password security questions, when done Click Enter on your keyboard.
- You will be brought to the privacy settings page. Toggle off all the options and click on Accept.
- On the Service Page, click “Skip” to load the home screen.
D. Install Guest Additions:
Now Windows is installed and running, time to install VirtualBox Guest Additions to improve performance and enable features like shared clipboard, drag-and-drop, and better GUI.
- In the VirtualBox window, click on Devices in the menu bar, and then select Insert Guest Additions CD image.
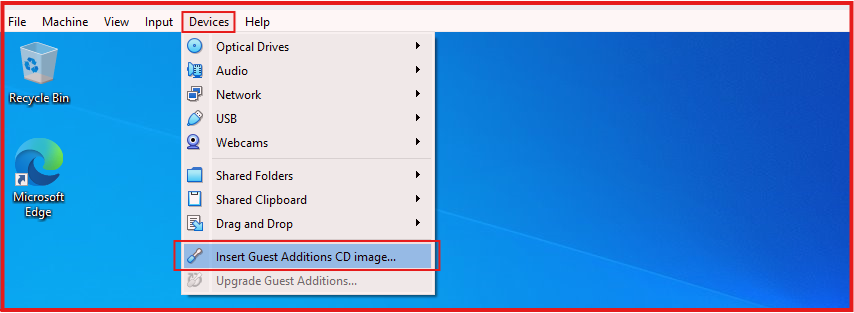
- This will mount a virtual CD with the Guest Additions installer.
- Open File Explorer in your VM and run the Guest Additions installer from the mounted CD.
- Follow the on-screen instructions to install.
- After installation, restart your virtual machine to complete the Guest Additions setup.
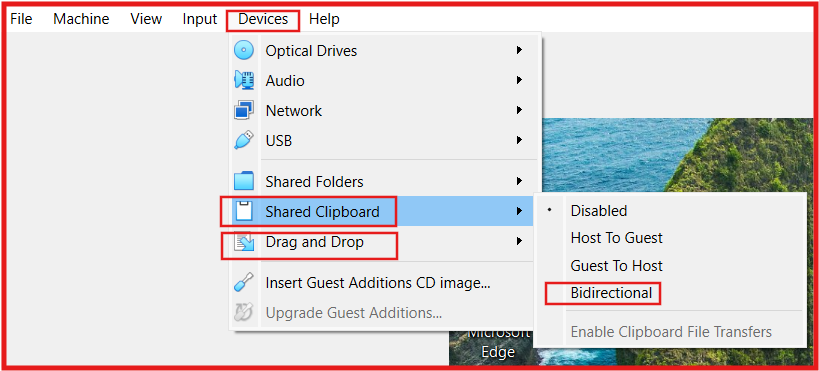
Next: enable Shared Clipboard and Drag and Drop:
- Click on Devices in the menu bar → Shared Clipboard → Bidirectional.
- Click on Devices in the menu bar → Drag and Drop → Bidirectional.
E. Permanently disable Microsoft Defender using Sordum’s Defender Control:
- Download Sordum’s Defender Control.
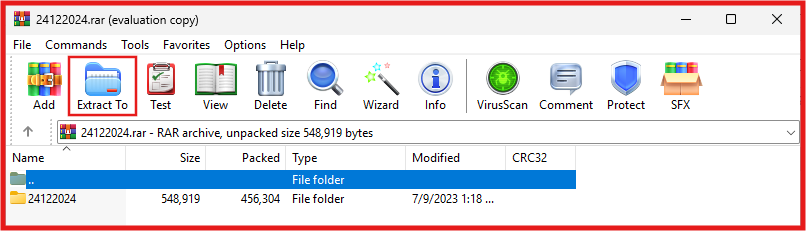
- Download WinRAR to unzip Sordum’s Defender Control: once downloaded locate the file in your download folder. Double click on it and follow the on screen instruction to install.
- Right Click on Sordum’s Defender Control. → Open with → WinRAR and type in the Password “sordum” to extract the file. And click Extract To.
- NEXT: Open the extracted Sordum’s Defender Control folder.
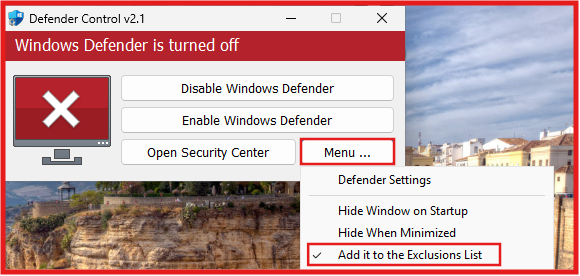
- Double-click on Defender_Settings and toggle off all Defender setting
- Double-click on dControl to lunch the app that will Permanently disable Microsoft Defender.
- Click on Disable Windows Defender

- Once Windows Defender is Disable the GUI of Defender Control will turn Red.
- Click on Menu → Add it to Exclusions List.
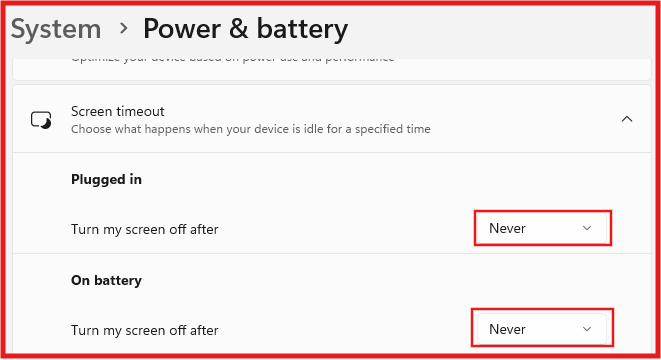
F. Stop Windows VM from entering sleep or idle mode.
- Press Windows + I to open the Settings window.
- Click on System > Power & battery > Screen timeout.
- Adjust Plugged in from 5 minutes to Never.
- Adjust On battery from 5 minutes to Never.
G. Take Snapshot of your VM.
Taking a snapshot of your VM in VirtualBox is a great way to save the current state of your virtual machine, so you can restore it if something goes wrong.
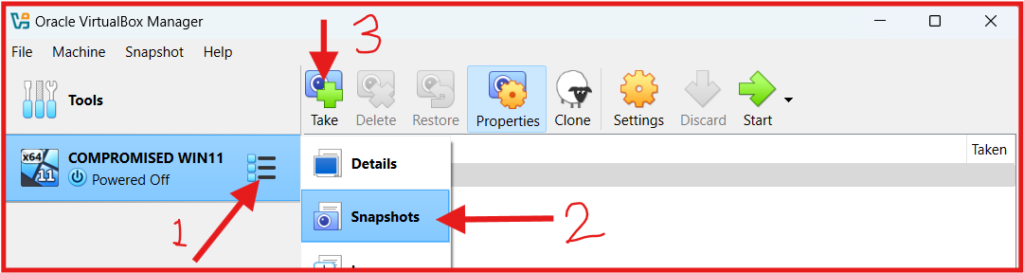
- Follow the Screenshot above to create a snapshot.
- Next: Name your Snapshot and click on OK.
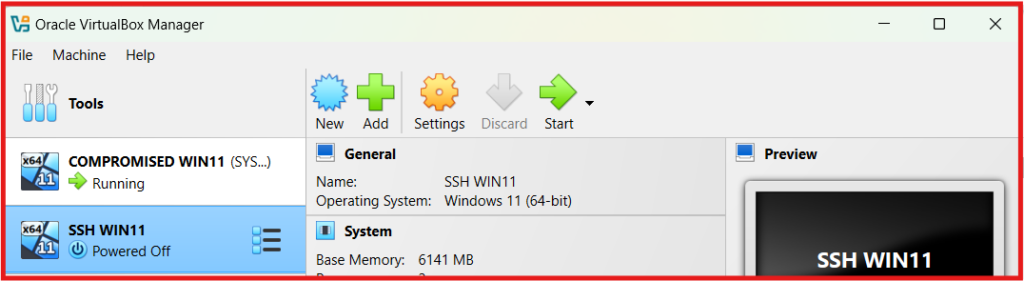
3. Create SSH Windows VM
To make this process easy and simple without repeating Step 2. is to clone the already created VM.
Make sure the just created snapshot is highlighted and follow the steps in the image below
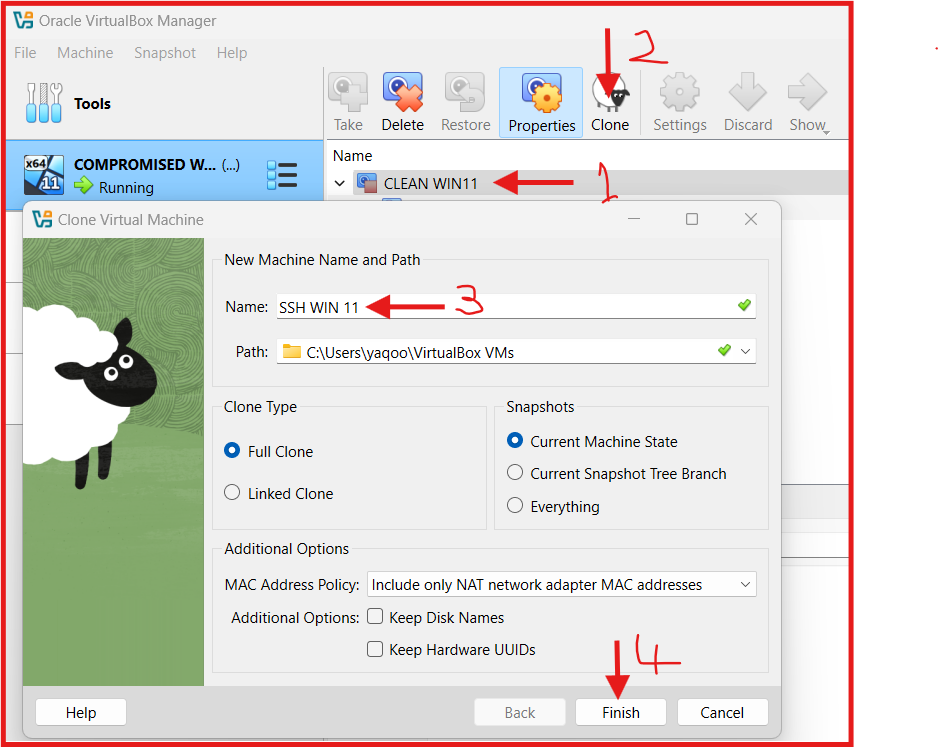
If you followed the steps in the image correctly you should now have two Windows VM
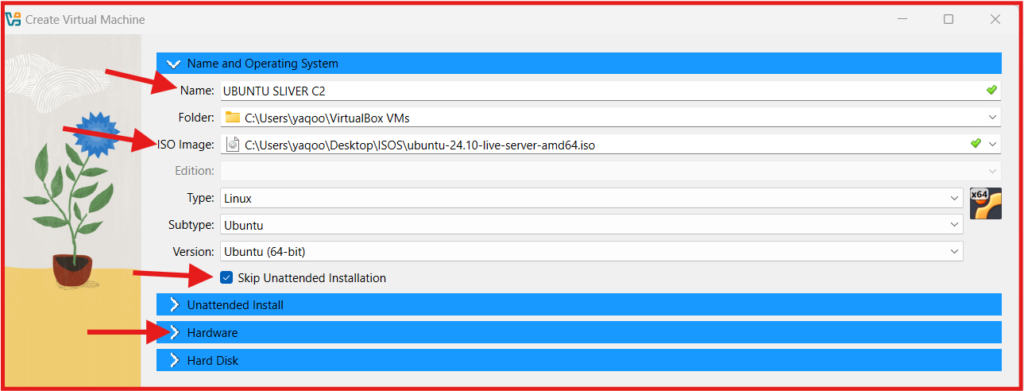
Step 4 Create C2 Server (Ubuntu) VM
- Click on The New button at the top to create a new VM
- Name: Choose a name for your virtual machine (UBUNTU SLIVER C2).
- ISO Image: Locate the downloaded Ubuntu Server ISO File in your Downloads and Double click on it.
- Check the box of: Skip Unattended installation.
- NEXT: Click on “Hardware”.
- Allocate Base Memory and Processor:
- Base Memory: 4GB (4096 MB).
- Processor: 2 CPU.
- NEXT: Click on “Hard Disk” to Create a Virtual Hard Disk:
- Hard Disk Size: 35GB.
- Click on Finish.
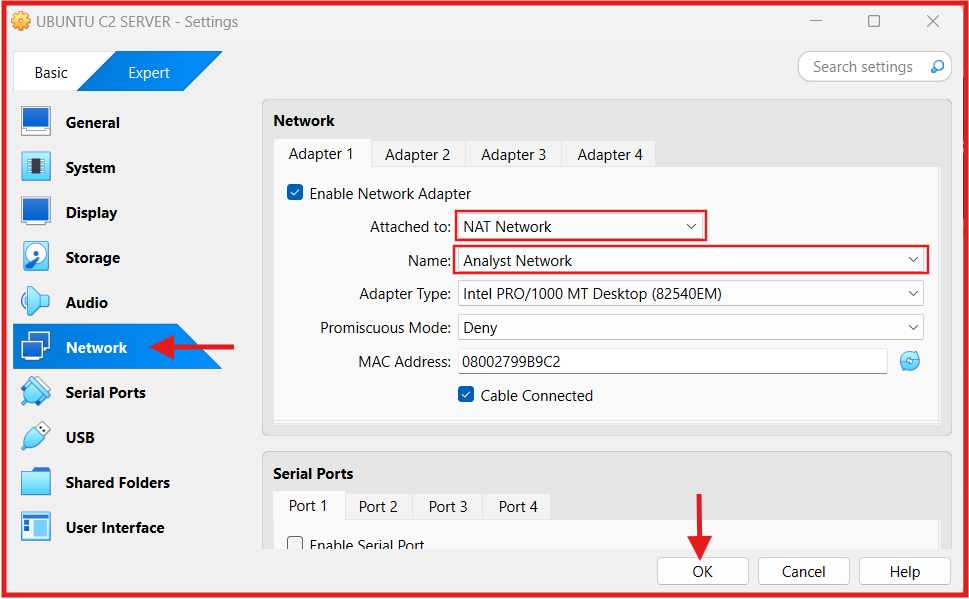
B. Attach Ubuntu VMs to the NAT Network (Analyst Network)
- Click the Settings button (gear icon) at the top of the VirtualBox window.
- A pop up Settings window will appear.
- Click on Network.
- In the Adapter 1 section, make sure the Enable Network Adapter box is check (enabled).
- Attached to field: Click on NAT Network from the dropdown menu.
- In the Name field, select the NAT Network created earlier (Analyst Network).
- click OK to save the settings.
C. Ubuntu Server Installation:
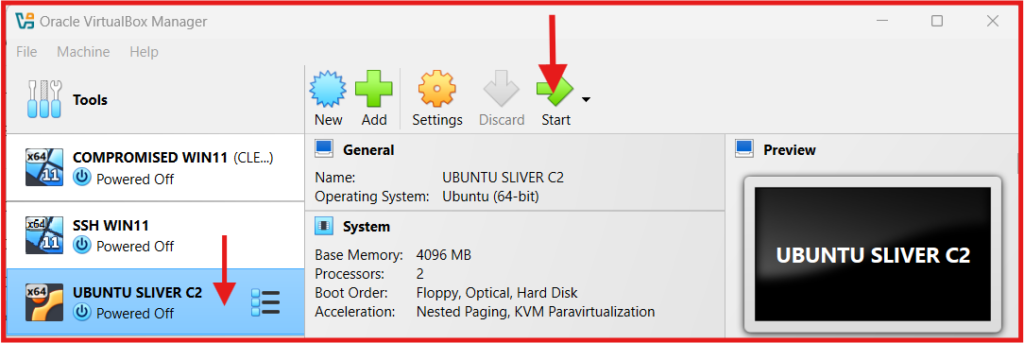
- Select the new virtual machine and click on the Green Start button at top right.
- The virtual machine will boot from the ISO file, and the Ubuntu installation process will begin.
- Select your language → Press Enter
- Choose your keyboard layout → Press Enter
- Choose Install Ubuntu Server → Press Enter
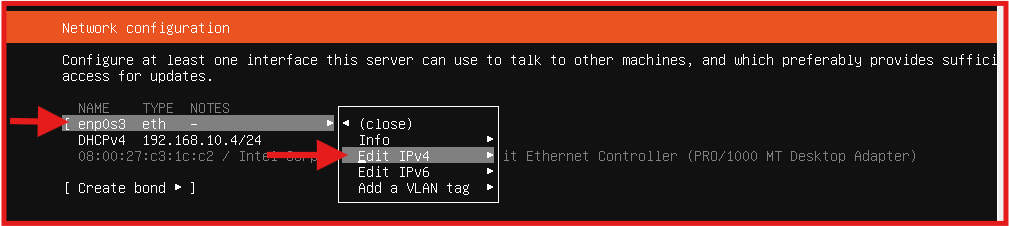
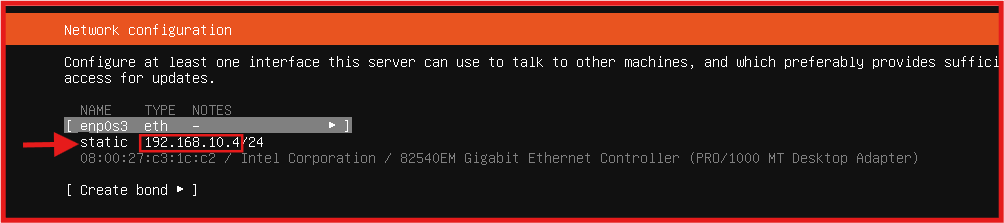
- Networking Configuration (static IP) follow the steps in the below screenshot.
- Once the installation is complete, you will arrive on the below screenshot’
Next:

Next:
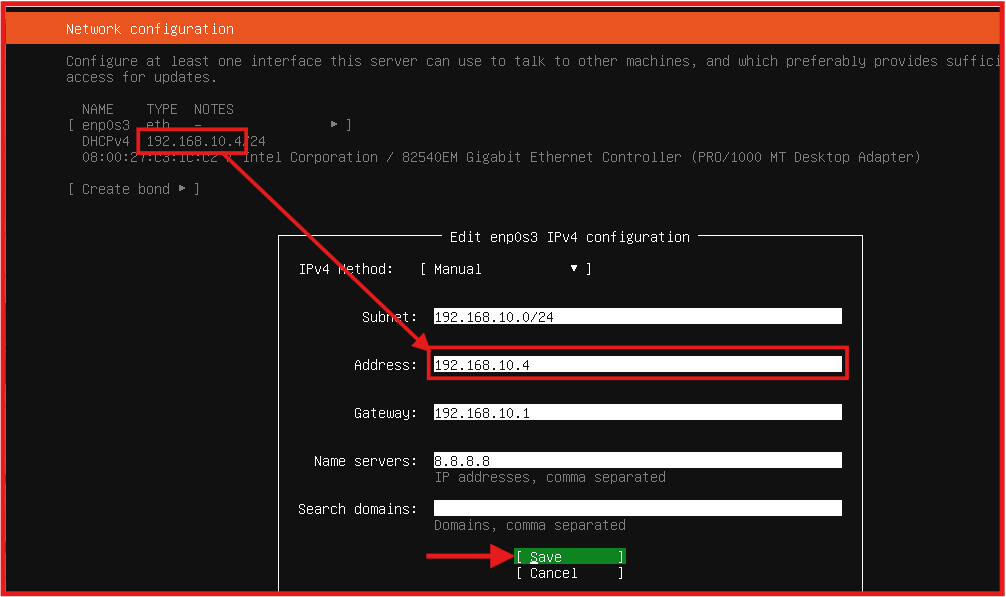
Take NOTE of the Ubuntu Server IP as it will be needed going forward.
- Choose Continue without network.
- Choose the disk to install Ubuntu on (select the virtual disk and confirm to erase).
- Set up your name, server name, username and password.
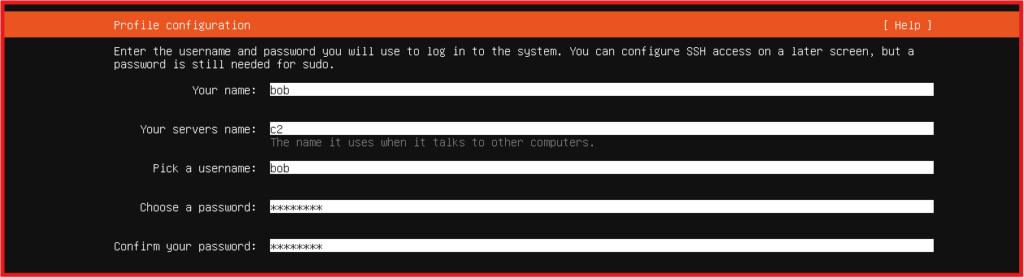
- NEXT: Choose install OpenSSH server (recommended as we will SSH later) and Continue to complete the Installation.
- Hit Enter on Reboot Now to reboot the VM.
- NOTE: the VM will hangs on “removing the CDROM” Hit Enter to load the VM.
- Login with your username and password
- Basic Connectivity Test: (DNS and outbound connection)
ping -c 3 google.com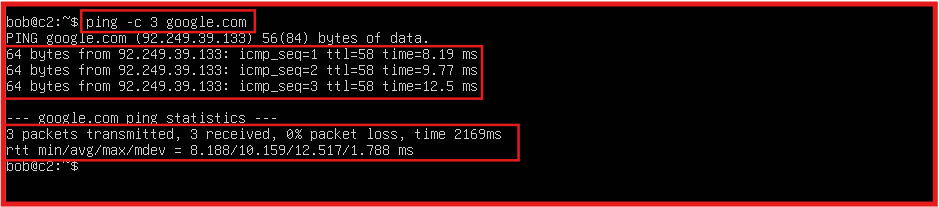
D. Setup A C2 Server (Sliver: Adversary Emulation/Red Team Framework)
IMPORTANT STEP: we’ll set up our attack infrastructure by remotely accessing our Ubuntu Server VM, from the SSH Windows VM Created earlier. To make your workflow smoother, especially when copying and pasting commands.
I recommend using an SSH client. Most modern systems already have SSH support:
- MacOS / Linux / Windows 10+: Built-in SSH support via Terminal or Command Prompt.
- Older Windows versions: You may need a third-party SSH tool like PuTTY.
Use the static IP address you noted during your Ubuntu Server VM setup, and from your SSH Windows system’s PowerShell, run:
ssh bob@(Ubuntu Server)
Once logged in, elevate your privileges for easier configuration:
sudo suDownload the Sliver C2 server binary
wget https://github.com/BishopFox/sliver/releases/download/v1.5.34/sliver-server_linux -O /usr/local/bin/sliver-serverMake the server binary executable
chmod +x /usr/local/bin/sliver-serverInstalling “mingw-w64” is essential if you plan to compile Windows payloads from a Linux host, especially when using something like Sliver.
apt install -y mingw-w64Verify Installation
sliver-server --versionCreate a directory that will house our payload
mkdir -p /opt/sliverIf all the above steps complete successfully, your attacker C2 server is now set up and ready.
E. Sysmon installation on Windows VM
Sysmon is a powerful tool from the Sysinternals Suite that provides detailed telemetry on Windows endpoints. It’s essential for monitoring a wide range of system activity and is highly valuable for analysts at all levels.
To install Sysmon, open PowerShell as Administrator.
Run the following command in the PowerShell window to download Sysmon:
Invoke-WebRequest -Uri https://download.sysinternals.com/files/Sysmon.zip -OutFile C:\Windows\Temp\Sysmon.zipExtract the Sysmon Files by Unziping the downloaded archive:
Expand-Archive -LiteralPath C:\Windows\Temp\Sysmon.zip -DestinationPath C:\Windows\Temp\SysmonDownload SwiftOnSecurity’s widely used Sysmon configuration file:
Invoke-WebRequest -Uri https://raw.githubusercontent.com/SwiftOnSecurity/sysmon-config/master/sysmonconfig-export.xml -OutFile C:\Windows\Temp\Sysmon\sysmonconfig.xmlNow install Sysmon using the configuration file:
C:\Windows\Temp\Sysmon\Sysmon64.exe -accepteula -i C:\Windows\Temp\Sysmon\sysmonconfig.xml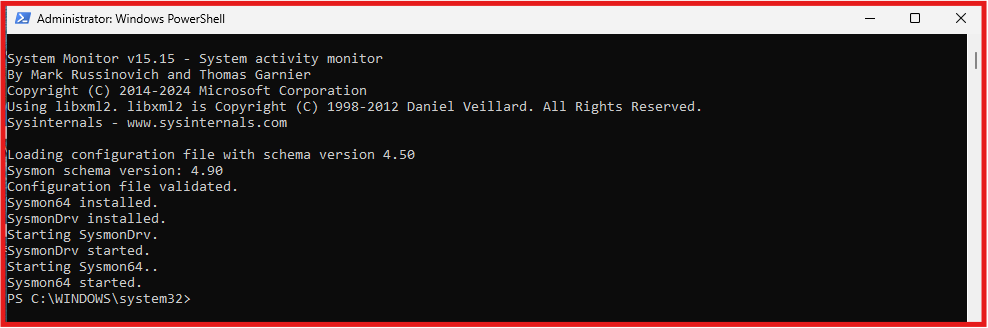
Run the following PowerShell command to check the status of the Sysmon64 service:
Get-Service -Name sysmon64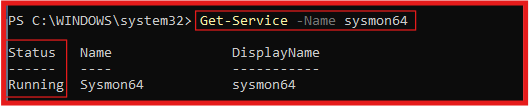
Confirm Sysmon is actively logging system activity, check the event log:
Get-WinEvent -LogName Microsoft-Windows-Sysmon/Operational -MaxEvents 5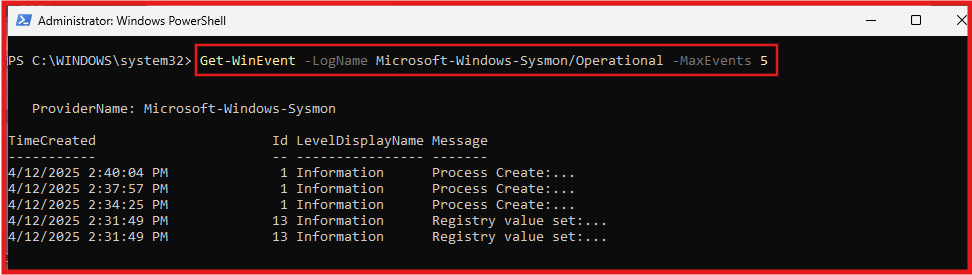
F. LimaCharlie EDR installation on Windows VM
LimaCharlie is a powerful SecOps Cloud Platform that includes:
- A cross-platform EDR (Endpoint Detection and Response) agent
- Built-in log shipping and ingestion
- A customizable threat detection engine
- LimaCharlie offers a free tier for up to two systems, which is perfect for labs and learning.
LimaCharlie EDR Free account sign-up and Sensor (Agent) Installation on a Windows VM
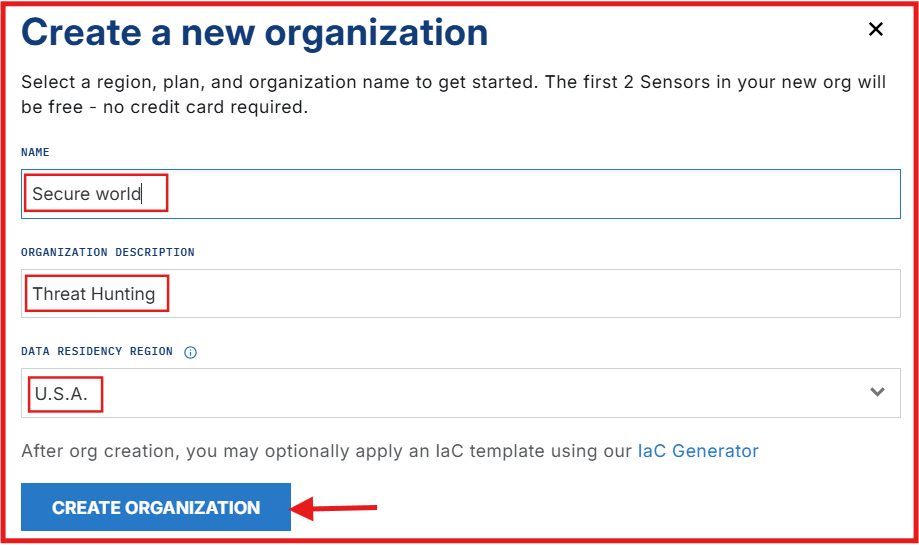
- Go to limacharlie.io and sign up.
- Once you’re logged in: Create a New Organization
Adding a Sensor (Agent) to Your Windows VM:
- After the org is created: click Add Sensor.
- Choose: Windows Platform.
- Select an Installation Key: Click on CREATE NEW and give it a Name (Home Lab).
- Click on SELECT.
- Choose the x86-64 (.exe) sensor download option
- Download Installer.
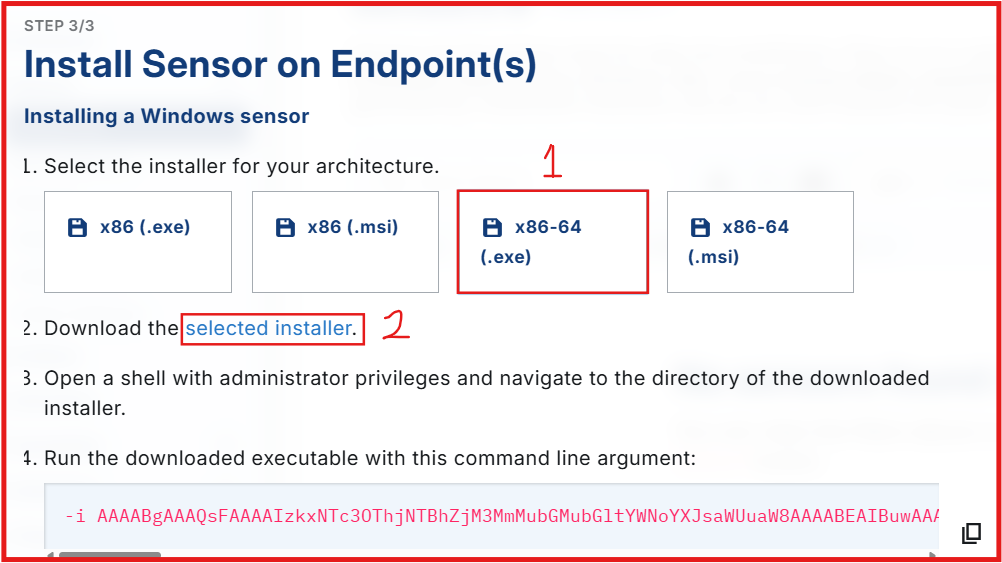
- Drag and drop the downloaded installer to your VM Downloads folder.
- Open PowerShell as Administrator.
- Change your current working directory:
cd C:\Users\bob\DownloadsCopy the command line argument provided by LimaCharlie which contains the installation key.

Type hcp and hit tab on your keyboard. to pull out (LimaCharlie Sensor)

Paste the copy command after the .exe file (LimaCharlie Sensor).

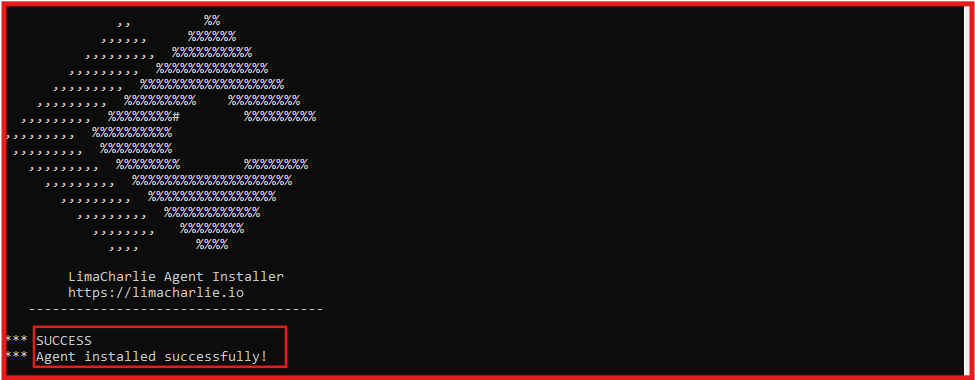
Expected output Via Command line for successful install.
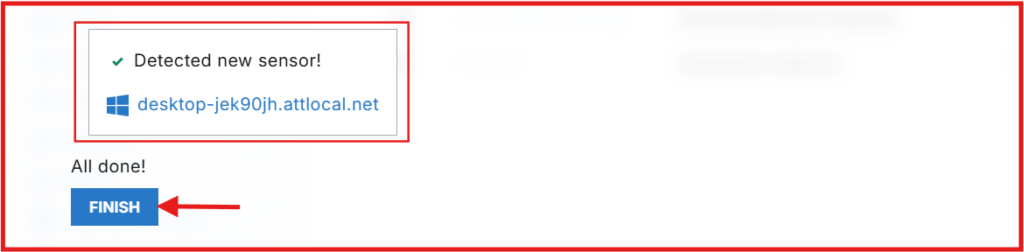
Expected output Via LimaCharlie web UI for successful install.
Configuring LimaCharlie to Collect Sysmon Event Logs.
Let’s enhance LimaCharlie’s telemetry by adding Sysmon event log collection. This allows LimaCharlie to ingest detailed Windows event data alongside its own EDR insights.
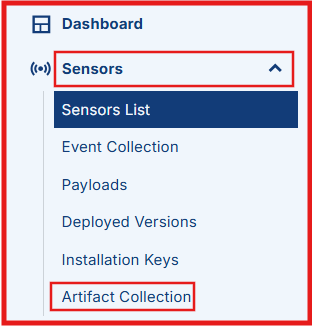
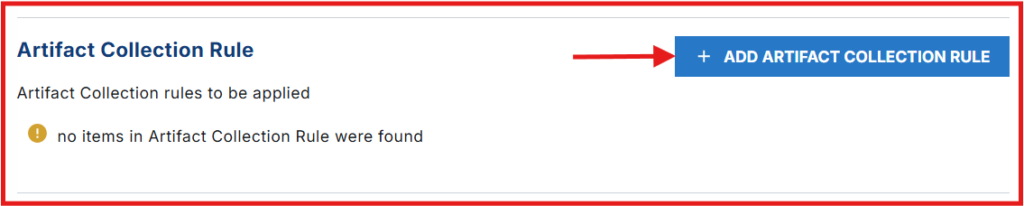
In the left-pane menu, click Sensors to expand the menu > Artifact Collection.
Click Add Artifact Collection Rules.
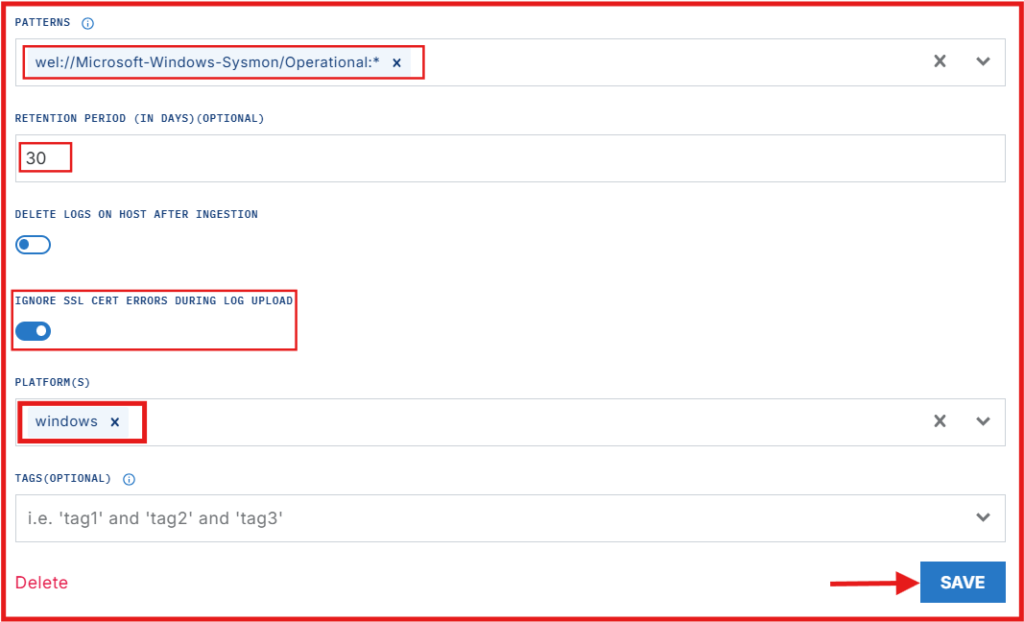
Give your rule a Name: windows-sysmon-logs.
Fill out the rule details as follows:
- Patterns: wel://Microsoft-Windows-Sysmon/Operational:*
- Retention Period: 30
- Ignore SSL cert errors during log upload: Toggle it on
- Platforms: Windows
- Click “Save Rule” to apply the changes.
What This Does:
- LimaCharlie will now begin shipping Sysmon logs, which offer rich telemetry similar to that of an EDR. While some of the data may overlap with LimaCharlie’s native telemetry, Sysmon remains a powerful visibility tool and works well alongside any EDR Sensor (agent).
- Another key reason for ingesting Sysmon logs is that most Sigma rules designed to work with Sysmon data.
Enable Sigma EDR Ruleset
Sigma rules are an open-source set of standardized detection rules designed to be used across different security platforms (SIEMs, EDRs, etc.).
To simplify this process we will enable Sigma EDR Ruleset for Automated Incident Response.
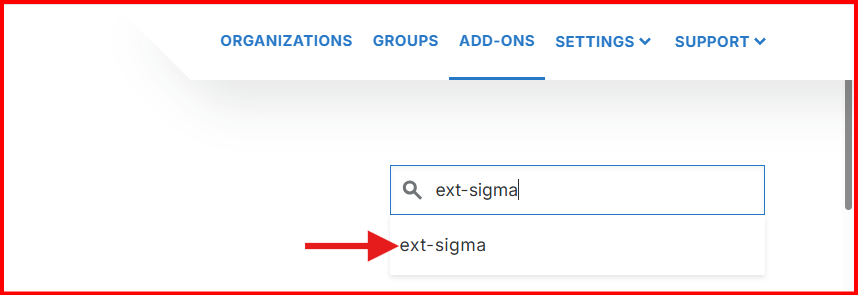
Click “Add-ons” In the top right corner of your Dashboard.

Search for “ext-sigma” and click to add.
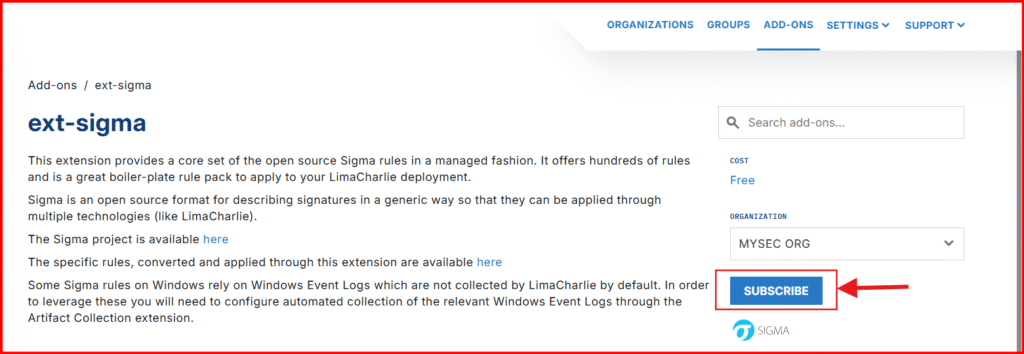
To enable the free Sigma EDR ruleset. Click “Subscribe” on the right-hand side.
Coming Up Next…
In the next post of this series, we’ll:
- Deploy a C2 payload onto a Windows VM.
- Analyze the resulting telemetry using Sysmon and LimaCharlie.
- Start writing custom detection rules based on observed behavior.
Stay tuned – things are about to get a lot more hands-on (and fun).
Part 2 – Adversary emulation, and detecting initial footprint.


