
Automating Malware Detection with YARA
First time here? Make sure you check out the Intro, Part 1, Part 2 , Part 3 and Part 4 before diving into this post. They lay the foundation you’ll need for what’s coming next.
Overview
In this post, we’ll unlock one of the more advanced capabilities of any good EDR sensor: automated YARA scanning of files and processes. By the end, you’ll have a system that not only detects malware based on YARA signatures, but also scans new files and running processes in real time.
What is YARA?
YARA is a powerful tool used to identify and classify malware using textual or binary patterns. It lets you write rules that describe characteristics of known malware, which can then be used to scan files, memory, or even network traffic.
Originally developed by malware researcher Victor M. Alvarez at Hispasec Sistemas (the folks behind VirusTotal), YARA has become a go-to tool for threat hunting and incident response. Today, it’s an industry standard thanks to its flexibility and the thriving community that supports it.
Let’s enhance our detection strategy by incorporating YARA signature for the Sliver C2 payload.
Since we’re working with the Sliver C2 framework, we can make our detection more precise by using a YARA signature specifically designed to identify Sliver activity. Fortunately, the UK’s National Cyber Security Centre (NCSC) has shared some excellent threat intelligence on Sliver—including detailed YARA rules and other detection techniques.
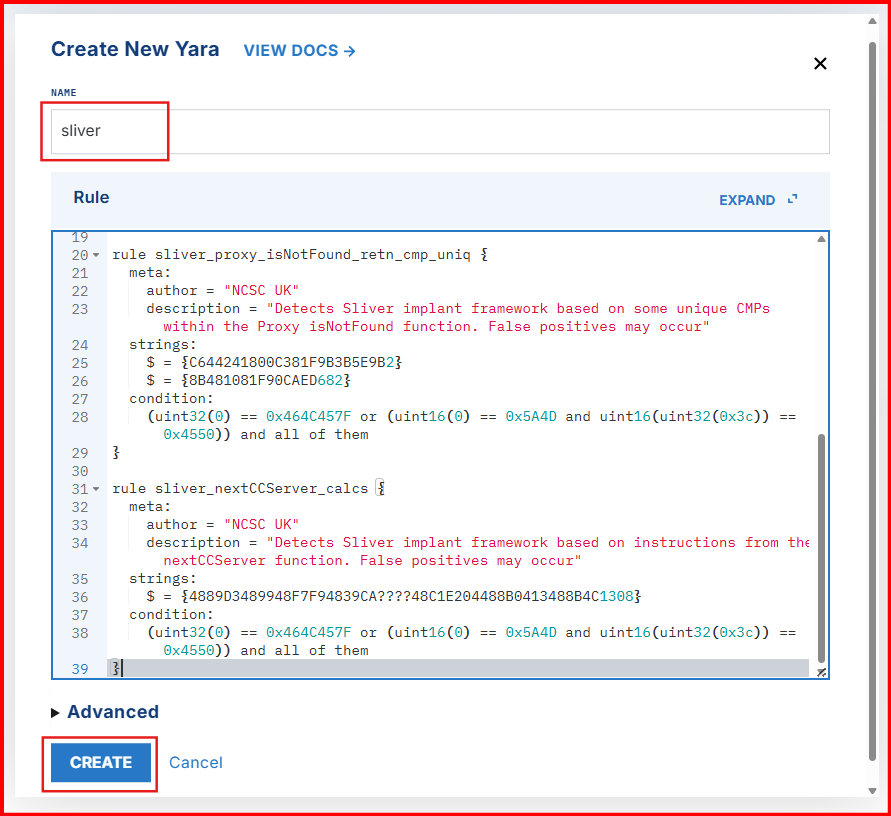
1. Head to LimaCharlie Dashboard and to Automation > YARA Rules > ADD YARA RULE
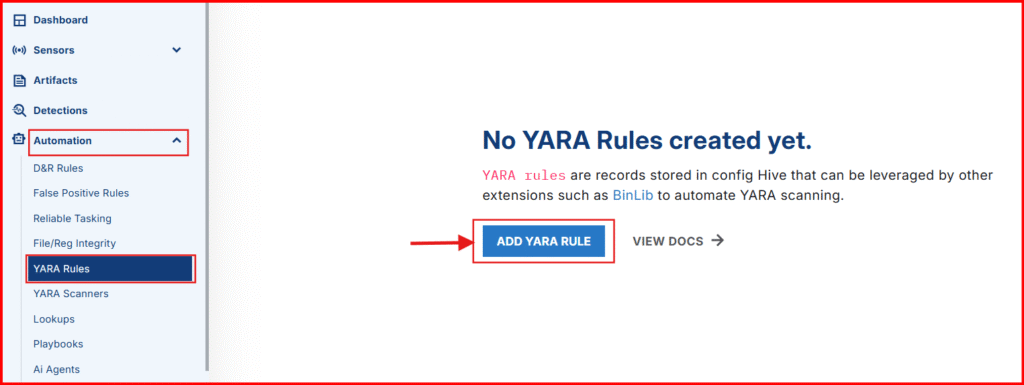
- Give your rule the name: “sliver“
- Copy and paste the rule below into the Rule Section
rule sliver_github_file_paths_function_names {
  meta:
    author = "NCSC UK"
    description = "Detects Sliver Windows and Linux implants based on paths and function names within the binary"
  strings:
    $p1 = "/sliver/"
    $p2 = "sliverpb."
    $fn1 = "RevToSelfReq"
    $fn2 = "ScreenshotReq"
    $fn3 = "IfconfigReq"
    $fn4 = "SideloadReq"
    $fn5 = "InvokeMigrateReq"
    $fn6 = "KillSessionReq"
    $fn7 = "ImpersonateReq"
    $fn8 = "NamedPipesReq"
  condition:
    (uint32(0) == 0x464C457F or (uint16(0) == 0x5A4D and uint16(uint32(0x3c)) == 0x4550)) and (all of ($p*) or 3 of ($fn*))
}

rule sliver_proxy_isNotFound_retn_cmp_uniq {
  meta:
    author = "NCSC UK"
    description = "Detects Sliver implant framework based on some unique CMPs within the Proxy isNotFound function. False positives may occur"
  strings:
    $ = {C644241800C381F9B3B5E9B2}
    $ = {8B481081F90CAED682}
  condition:
    (uint32(0) == 0x464C457F or (uint16(0) == 0x5A4D and uint16(uint32(0x3c)) == 0x4550)) and all of them
}

rule sliver_nextCCServer_calcs {
  meta:
    author = "NCSC UK"
    description = "Detects Sliver implant framework based on instructions from the nextCCServer function. False positives may occur"
  strings:
    $ = {4889D3489948F7F94839CA????48C1E204488B0413488B4C1308}
  condition:
    (uint32(0) == 0x464C457F or (uint16(0) == 0x5A4D and uint16(uint32(0x3c)) == 0x4550)) and all of them
}- Click on Create to save the rule
Now let’s configure LimaCharlie to respond when a YARA match is detected. We’ll do this by creating D&R (Detection & Response) rules that automatically generate alerts whenever a YARA rule is triggered.
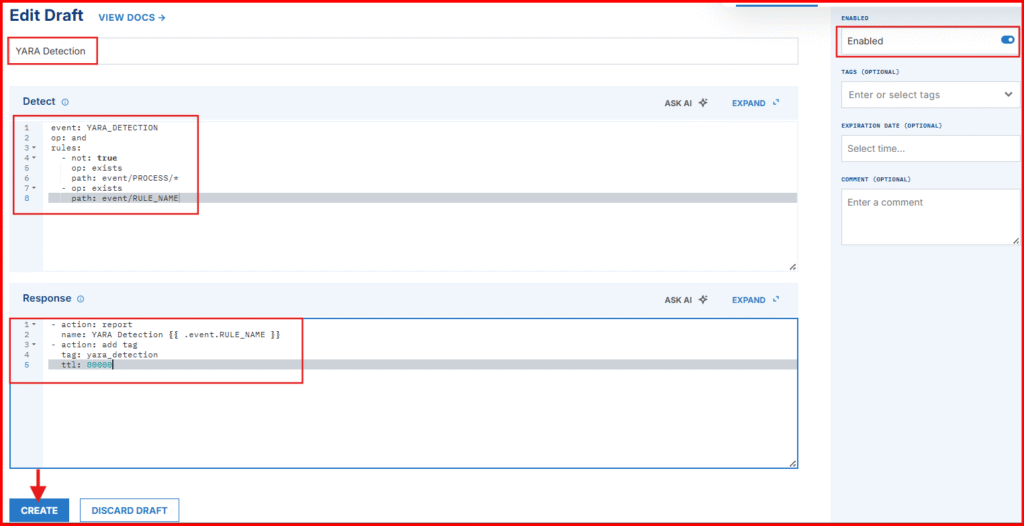
2. Tuggle Down Automation > D&R Rules > ADD Rule

- Give your rule the name: YARA Detection
- In the “Detect” section paste the following:
event: YARA_DETECTION
op: and
rules:
  - not: true
    op: exists
    path: event/PROCESS/*
  - op: exists
    path: event/RULE_NAME
✅ What This Rule Does in Simple Terms: It triggers when a YARA rule detects a threat in a file, not in memory. This is useful for scanning newly dropped files (e.g., .exe files in a Downloads folder) and generating alerts accordingly.
- In the “Respond” section, paste the following:
- action: report
  name: YARA Detection {{ .event.RULE_NAME }}
- action: add tag
  tag: yara_detection
ttl: 80000- Click on Create to save the rule
Let’s put our new YARA signature to the test.
Since we already know there’s a Sliver implant in the Downloads folder on our Windows VM, we can run a manual YARA scan with the EDR sensor to test if our setup is working correctly. This quick check will confirm that our YARA signature is functioning as expected and that everything is properly configured so far.
1. Open Sensors List in LimaCharlie and select your Windows VM

- Open the Sensor Console
- Run the command below, replacing
[payload_name]with your file name:
yara_scan hive://yara/sliver -f c:\Users\Bob\Downloads\[payload_name].exe- Click on SEND to execute the command.
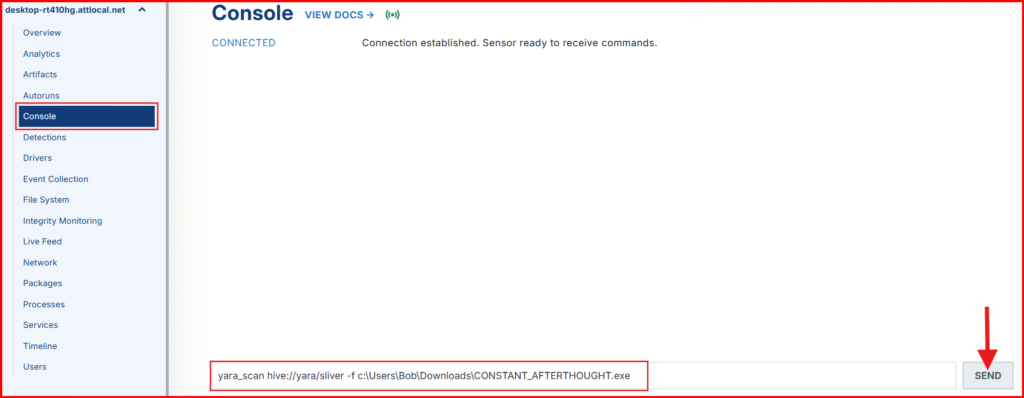
Your output should be similar to mine, showing that the Sliver YARA rule successfully detected a match—confirming the signature is working as intended.
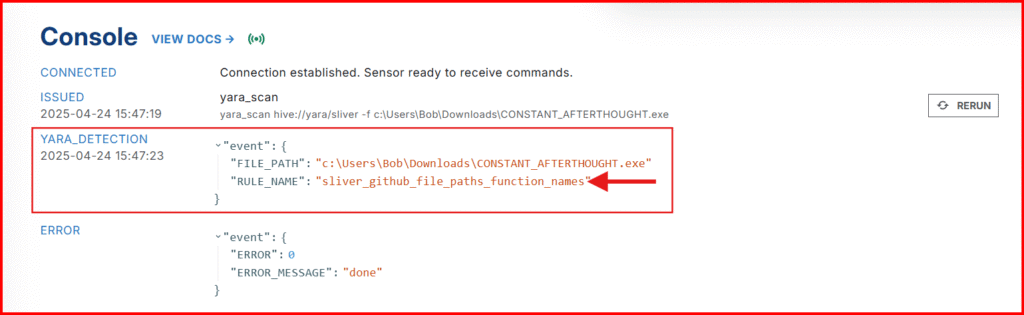
2. Head to the Detections tab to confirm we have new Detection for a YARA match

Time to Automate the Scanning of New Executables
We’ll now automatically scan any .exe dropped or downloaded into the Downloads folder.
Create a New D&R Rule
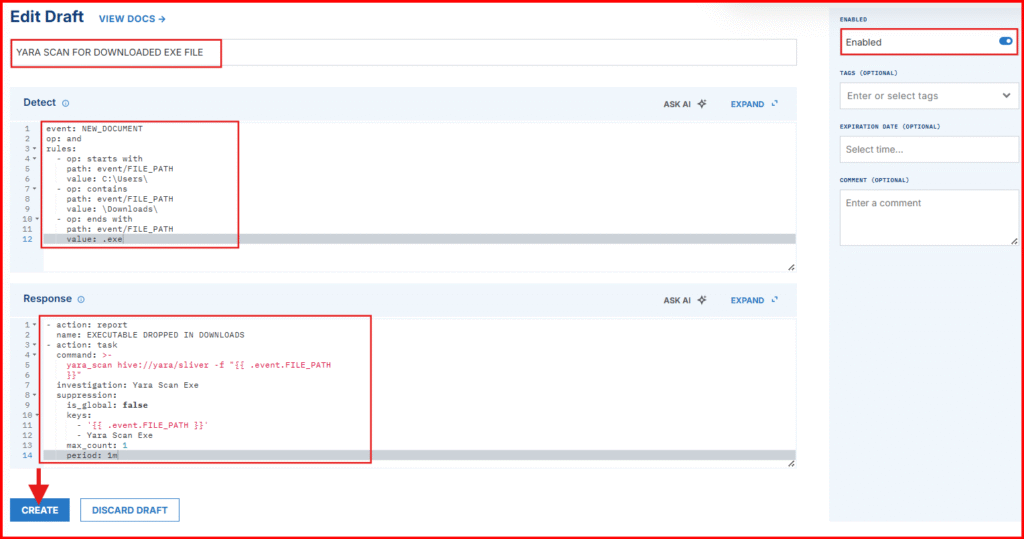
1. Tuggle Down Automation > D&R Rules > ADD Rule
- Give your rule a name: YARA Detection
- In the “Detect” section paste the following:
event: NEW_DOCUMENT
op: and
rules:
  - op: starts with
    path: event/FILE_PATH
    value: C:\Users\
  - op: contains
    path: event/FILE_PATH
    value: \Downloads\
  - op: ends with
    path: event/FILE_PATH
    value: .exe
✅ What This Rule Does in Simple Terms: It detects when a new executable file (.exe) is added to a user’s Downloads folder—a common way for malware to enter a system.
- action: report
  name: EXE dropped in Downloads directory
- action: task
  command: >-
    yara_scan hive://yara/sliver -f "{{ .event.FILE_PATH
    }}"
  investigation: Yara Scan Exe
  suppression:
    is_global: false
    keys:
      - '{{ .event.FILE_PATH }}'
      - Yara Scan Exe
    max_count: 1
period: 1m- Click on Create to save the rule
✅ What This Rule Does in Simple Terms: Whenever a new .exe shows up in the Downloads folder, this rule:
- will Alerts you.
- Immediately scan that file with your custom Sliver YARA signature.
- Avoid spamming the system by limiting repeated actions on the same file within one minute.
- Perfect for catching suspicious payloads downloaded by users or malware droppers.
Automatically Scan Running Processes from the Downloads Directory with YARA
Let’s walkthrough how to set up automated YARA scans for any process launched from the user’s Downloads directory using LimaCharlie’s Detection & Response (D&R) rules.
1. Navigate back to Automation > D&R Rules > New Rule.
- Paste the following in the Detect block:
event: NEW_PROCESS
op: and
rules:
  - op: starts with
    path: event/FILE_PATH
    value: C:\Users\
  - op: contains
    path: event/FILE_PATH
    value: \Downloads\
✅ This logic matches any process that starts from a user’s Downloads folder, which is a common location for malware payloads.
- Paste the following in the Respond block:
- action: report
  name: Execution from Downloads directory
- action: task
  command: yara_scan hive://yara/sliver-process --pid "{{ .event.PROCESS_ID }}"
  investigation: Yara Scan Process
  suppression:
    is_global: false
    keys:
      - '{{ .event.PROCESS_ID }}'
      - Yara Scan Process
    max_count: 1
    period: 1m
✅ What This Rule Does in Simple Terms:
- Instead of scanning the FILE_PATH, we’re scanning the actual running process via its PROCESS_ID.
- We’re using a custom YARA rule (sliver-process) rather than default ones like NCSC. Why? In testing, I found that NCSC rules often miss live Sliver beacons due to their specific match conditions. So I built a rule that detects Sliver strings I verified using LimaCharlie’s string-dump capabilities.
Simulate a Payload Drop in Downloads to Test our New Rules.
To simplify the process, we won’t re-download the Sliver payload—instead, we’ll simulate a fresh download by moving the file to a different location and then placing it back into C:\Users\User\Downloads.
1. Move the payload out of Downloads (to simulate removal):
Move-Item -Path C:\Users\Bob\Downloads\[payload_name].exe -Destination C:\Users\Bob\Documents\[payload_name].exe
2. Move it back into Downloads to generate the NEW_DOCUMENT event:
Move-Item -Path C:\Users\Bob\Documents[payload_name].exe -Destination C:\Users\Bob\Downloads[payload_name].exeNOTE: Replace [payload_name] with your actual file name

3. Now go check your Detections tab!
You should see:
- An alert for a new
.exedropped in Downloads - A YARA detection from our scan rule shortly after

Trigger a Scan on a Running Process
1. Now, let’s test the NEW_PROCESS detection.
- Open an Admin PowerShell prompt
- Kill any old Sliver process:
Get-Process [payload_name] | Stop-Process- NOTE: Use the name without
.exe— e.g.,STRIKING_PASSIONinstead ofSTRIKING_PASSION.exe - If you see an error, it likely means either the process wasn’t running (which is totally fine), or you entered the
[payload_name]incorrectly.

2. Launch your Sliver payload again:
C:\Users\Bob\Downloads\[payload_name].exe
3. Check the Detections tab again!
You should see:
- An alert for Execution from Downloads directory
- A follow-up YARA detection on the process memory

Boom. Mission accomplished. 💪
More Possibilities!
Now that your automated YARA scanning is working, think about the possibilities…
- Scan for Metasploit Shellcode and Payload Strings.
- Scan suspicious
rundll32processes for Cobalt Strike - Monitor
wwwrootdirectories for webshells - Automatically quarantine, delete, or block malicious files and processes
The possibilities is endless and the only limit is your imagination. Now you know what evil looks like, Time to go find evil. 🕵️♂️🔥
What’s Next?
The Art of Tuning False Positives.
Head over to Part 6, where we shift focus to one of the most important skills in detection engineering—tuning false positives. You’ll learn how to refine your rules for better accuracy, reduce noise, and ensure you’re only alerting on what truly matters.
Part 6 – The Art of Tuning False Positives.


